In 7 Schritten zum Amazon Listing das sich verkauft!
Ein optimiertes Listing ist neben dem verkauften Produkt selbst einer der wichtigsten Faktoren zum Erfolg auf der Verkaufsplattform Amazon. In einem Verdrängungsmarkt wie wir ihn heute in vielen Branchen erleben ist das Listing nicht mehr nur eine Notwendigkeit zum Verkaufen. In einem von Konkurrenzkämpfen geprägten Markt ist das Listing Deine Möglichkeit, die Konkurrenz in Deiner Branche abhängen. Richtig eingesetzt, bietet ein Amazon Listing nahezu unbegrenzte Möglichkeiten. Neben der Präsentation Deines Produktes geht es um Themen wie Markenimage aufbauen, Storytelling oder sogar Up- und Crosssells. Doch schauen wir uns zunächst einmal an, was eigentlich die Schlüsselelemente eines Listings sind.
Die 9 Schlüsselelemente eines Listings
- Produkttitel
- Produktbilder- und Videos
- Bullet Points
- Backend Keywords
- Zusätzliche Produktangaben
- Produktbeschreibung ODER A+/Premium A+
- Bewertungen
- Brand Story
- Brand Store
Wenn du noch nicht alle der oben genannten Elemente kennst, empfehlen wir dir hier unseren Beitrag zum grundlegenden Aufbau einer Amazon Seite.
Wie hängen die unterschiedlichen Listing-Elemente zusammen?
Alle Elemente eines Listings erfüllen eine der drei Aufgaben:
- Kunden auf dein Listing zu bringen
- Kunden auf deinem Listing zum Kauf zu bewegen (konvertieren)
- Kunden zum Kauf von weiteren Artikeln zu bewegen
Ein effektives Amazon Listing nutzt SEO in beispielsweise Titel, Bullet Points, Backends etc., um bei relevanten Suchanfragen sichtbar zu sein. Durch einen ansprechenden Titel und ein optimiertes Hauptbild werden Kunden, die dein Angebot in der Suche finden, auf dein Angebot klicken. Ist der Kunde auf deinem Listing angekommen, spielen die Bereitstellung der für eine Kaufentscheidung benötigten Informationen in den Bullet Points, der Beschreibung oder den Bildern zusammen, um den Kunden zum Kauf zu bewegen. Weitere Markeninhalte wie die Brand Story, A+ Inhalte oder der Brand Store bieten Platz zum Aufbau von Vertrauen durch die Bereitstellung weiterer Informationen. Darüber hinaus sind Sie ideale Behälter zur Platzierung von Up- und Crosssells.
Nachdem wir uns nun ein grobes Verständnis für das Zusammenspiel der einzelnen Listingelemente erarbeitet haben, schauen wir uns nun an mit welchen Schritten Du dein Amazon Listing erstellen kannst:
In 7 Schritten zum Erfolg
Hinweis: Wir empfehlen dir während der gesamten Zeit die du an der Erstellung Deines Listings arbeitest die Amazon Sytleguides zu befolgen: https://sellercentral.amazon.de/help/hub/reference/G200270100?locale=de-DE Die Amazon Styleguides geben dir einen guten Überblick welche Richtlinien die du bei der Erstellung deines Produktes einhalten solltest.
Schritt 1: Keyword Recherche durchführen
An erster Stelle der Listing Erstellung steht eine Keywordrecherche. Natürlich weißt du als Experte, wie dein Produkt heißt oder wie du dein Produkt im Internet findest. Es ist jedoch in diesem Schritt wichtig genau zu verstehen, welche Suchbegriffe die Kunden aus deiner Zielgruppe verwenden, wenn Sie nach deinem Produkt suchen.
Beispiel: Sagen wir du verkaufst ein Schachbrett mit Figuren ist es logisch für dich das Keyword “Schachbrett” im Listing zu platzieren. Bei genauerer Recherche zeigt sich jedoch, dass es weitere Keywords gibt, über die Kunden Schalbretter suchen. Und diese haben eventuell sogar mehr Suchvolumen:
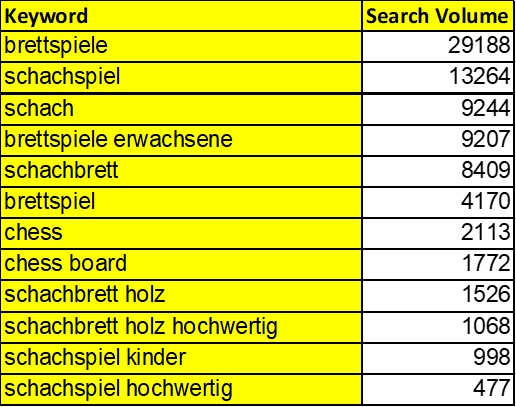
Würdest du in diesem Schritt keine Keyword Recherche durchführen, würdest du wertvolle Keywords wie z.B. “Schach” oder “Schachspiel” verschenken.
Deine Keywords kannst du dabei entweder mithilfe verschiedenster Tools wie Helium10 oder Jungle Scout analysieren, oder alternativ über die Amazon Suche oder das Amazon Seller Central.
Schritt 2: Produktbilder erstellen (lassen)
Die Produktbilder sind einer der wichtigsten Faktoren im gesamten Amazon Listing. Vermutlich kennst du es aus eigener Erfahrung, dass du beim Onlineshopping in den meisten Fällen zuerst auf die Produktbilder schaust, bevor du dir irgendwelche Texte anschaust.
Professionelle Produktbilder, die dein Produkt von verschiedenen Perspektiven zeigen und hochwertig präsentieren, werden hierbei immer wichtiger. Die Bilder werden dann zusätzlich zu Infografiken, Vergleichstabellen oder Detailansichten verarbeitet, um bestmögliche Ergebnisse zu erzielen. Im Idealfall stellt ihr euren Kunden sogar ein Produktvideo zur Verfügung.
Kurz gesagt: Optimierte Produktbilder werden dir das Verkaufen auf Amazon deutlich vereinfachen und sich direkt in einer erhöhten Click-Through Rate und Conversion Rate widerspiegeln. Auch wenn das Budget gerade anfänglich manchmal gering sein kann, lohnt sich die Investition in hochwertige Produktbilder auf jeden Fall.
Schritt 3: Titel formulieren (150-200 Zeichen)
Nachdem du im ersten Schritt bereits Deine Keywords analysiert und eingegrenzt hast, ist es nun an der Zeit, mit diesen Keywords Deine Amazon Listing Texte zu erstellen. Es gilt dabei die Regel, dass ein Keyword im ganzen Listing nur einmal vorkommen muss, um vom Algorithmus indexiert und damit in den Suchbegriffen angezeigt zu werden. Keywords im Titel werden dabei als relevanter angesehen, als Keywords in den Bullet Points oder in den Suchbegriffen. Bei allen Texten und Bildern ist es jedoch wichtig, die Amazon Richtlinien zu beachten!
Bei der Erstellung des Produkttitels solltest du folgenden 4 Punkte unbedingt beachten:
- Fokus auf Deine Zielgruppe: Überlege, welche Hauptmerkmale dein Produkt besonders machen und wie diese die Zielgruppe am besten ansprechen. Der Titel sollte genau auf deren Bedürfnisse und Suchgewohnheiten zugeschnitten sein.
- Hauptkeywords integrieren: Baue die 1-3 wichtigsten Keywords, die ihr bei der Recherche gefunden habt, in den Titel ein, um die Sichtbarkeit zu erhöhen.
- Marke und wesentliche Produktmerkmale: Vergiss nicht, den Markennamen und wichtige Infos wie Größe, Menge oder besondere Eigenschaften im Titel unterzubringen. Der Markenname steht dabei in der Regel an der ersten Stelle im Listing. Wichtige Angaben wie z.B. Größen sollten relativ weit vorne platziert werden, damit User diese auch auf kleineren Bildschirmen zu sehen sind. Am Titelbeginn stehen somit Marke, Main KWs und Größe!
- Lesbarkeit: Trotz all den Keywords und Informationen sollte in deinem Titel die Lesbarkeit nicht zu kurz kommen. Achte auf eine Balance zwischen Keywords, Informationen und Lesbarkeit.
Beispiele für gute Amazon Titel:
- [MARKENNAME] Schachspiel mit Schachbuch 38 x 38cm – Schach und Dame aus Walnussholz klappbar und magnetisch mit Reisetasche – Schachbrett Holz Set Chess board – Brettspiele
- [MARKENNAME] 200 Stück Meisenknödel MEISENkugel ohne Netz 18 kg | Körnerkugel für Wildvögel | Nährstoffreiches Ganzahresfutter für alle Vogelarten
Beispiele für schlechte Amazon Titel:
- 200 Meisenknödel ohne Netz
- Cressi Premium Trockenschnorchel Erwachsene
Schritt 4: Bullet Points erstellen: (ca. 5x 200 Zeichen)
Mit den Bullet Points stellt Amazon ca. 1000 Zeichen zur Verfügung, um dem Kunden wichtige Informationen zum Artikel zu liefern und alle für eine Kaufentscheidung nötigen Informationen bereitzustellen. Gleichzeitig solltest du für den Algorithmus weitere wichtige Keywords einbauen.
Bei der Erstellung der Bullet Points solltest du die folgenden 4 Punkte unbedingt beachten:
- Vorteile und Merkmale betonen: Nutze die Bullet Points, um die wichtigsten Produktvorteile und -merkmale, die ihr als entscheidend identifiziert habt, herauszustellen.
- Keywords geschickt einbauen: Streue weitere relevante Keywords aus der Recherche ein, aber achte darauf, dass es natürlich bleibt.
- Auf den Nutzen konzentrieren: Es zählt, was der Kunde davon hat. Stelle den Nutzen in den Vordergrund, nicht nur das Feature.
- Optional verwenden: Je nachdem ob es zu deinem Produkt passt kannst du auch am Anfang eines jeden Bullet Points einen Emoji verwenden.
- Anreize zum Kauf schaffen: Verwende eine Sprache, die zum Kauf motiviert.
Beispiele für gute Amazon Bullet Points:
- MAGNETISCH: Die Schachfiguren des Sets sind magnetisch und haben so jederzeit einen festen Halt auf dem 38 x 38 cm großen Schachbrett. Die Filzunterlage der Figuren schützt das Walnussholz vor Kratzern.
- SCHACHLERNBUCH: Das mitgelieferte Schachlernbuch “Schach lernen leicht gemacht” verfasst von den beiden Schachprofis Falko Bindrich und Tobias Hirneise vermittelt Kindern und Amateuren auf 80 Seiten fundamentale Schachkenntnisse.
- EINFACH ZU TRAGEN: Alle Schach und Damefiguren können problemlos im Inneren des Schachspiels verstaut werden. Verpackt in der mitgelieferten Reisetasche kann das Produkt überall hin mitgenommen werden.
- SCHACH UND DAME: Mitgeliefert werden im Set nicht nur die Schachfiguren mit zwei zusätzlichen Damen, sondern auch Damefiguren mit denen auch das Kult-Brettspiel “Dame” auf dem Schachbrett gespielt werden kann.
- VON PROFIS: Erstellt von den Profis Falko Bindrich und Tobias Hirneise ist dieses Schachpiel aus Holz perfekt für den Einstieg in die faszinierende Welt des Schachspiels geeignet.
Beispiele für schlechte Amazon Bullet Points:
- Hoher Widerstand
- Stärkung der Armmuskulatur
- Steigerung von Kraft und Ausdauer
- Verbesserung der körperlichen Leistungsfähigkeit
PS: Effektiv kannst du in den Bullet Points auch mehr als 1000 Zeichen unterbringen. Wichtig ist jedoch zu wissen, dass vom Algorithmus nur die eersten 1000 Zeichen beachten und somit indexiert werden. Keywords die du also in den Bullet Points einbaust sollten daher unbedingt in den ersten 1000 Zeichen untergebracht werden.
Schritt 5: Produktbeschreibung, Search Terms und Backend Attribute
Produktbeschreibung: Die Produktbeschreibung bietet dir, wie der Name schon sagt, die Möglichkeit, deinen Kunden weitere Informationen zu dir, deiner Marke oder deinem Produkt zu geben. Die Produktbeschreibung wird dabei sowohl im Amazon-Algorithmus als auch in der Google Suchmaschine indexiert. Daher ist es auch hier wieder wichtig, Keywords zu verwenden. Um die Produktbeschreibung so ansprechend wie möglich zu gestalten, kannst du diese über HTML formatieren.
Die aktuellen Entwicklungen zeigen jedoch, dass der sogenannte A+ Content die Produktbeschreibung immer mehr ablöst bzw. zu einem Keyword Speicher umwandelt. A+ ( vormals EBC) bietet dir die Möglichkeit, deinen Kunden die Produktbeschreibung grafisch aufbereitet zu übermitteln und hat sich über die letzten Jahre als Conversion Rate Booster etabliert. Wichtig ist zu verstehen, dass entweder A+ Content oder die Produktbeschreibung auf der Amazon Detailseite angezeigt wird – die Anzeige von beidem ist nicht möglich.
Search Terms (250 Bytes): Die Search Terms oder zu Deutsch Suchbegriffen sind ein Teil des Amazon Listings, welcher nicht für Kunden sichtbar ist. Hier geht es darum, möglichst viele relevante Keywords ins Listing zu integrieren. Es bietet sich beispielsweise an, die Keywords aus deiner Keywordrecherche zu verwenden, die du noch nicht genutzt hast. Außerdem ist es gängige Praxis, typische Schreibfehler-Variationen des Main Keywords zu integrieren. Die Search Terms müssen dabei nicht durch Kommas getrennt werden und können einfach ohne Formatierung im Seller Central eingefügt werden:
Backend Attribute: Als Backend Attribute werden verschiedene Felder bezeichnet, die Du während dem Anlegen deines Produktes im Seller Central füllen kannst (Bsp. Altersgruppe, Inhaltsstoffe, Lieferumfang, etc….). Unsere Erfahrung hat gezeigt: Je mehr Informationen Du Deinen Kunden anbietet, desto besser. In der Regel resultiert das Ausfüllen der Backend Attribute in mehr Verkäufen, aber auch weniger Rückgaben.
Schritt 6: Brand Story und Brand Store
Die Brand Story und der Brand Store sind wie der A+ oder sogar Premium A+ Content Features, auf die du Zugriff hast, wenn du deine Marke im Amazon Brand Registry registriert hast. Beide Elemente bieten Platz, über deine Marke zu sprechen und Up- und Crosssells zu platzieren.
Schritt 7: Listing im Amazon Seller Central hochladen
Im letzten Schritt zum Amazon Listing erstellen geht es nun darum, Dein Amazon Listing im Seller Central hochzuladen. Navigiere hierzu über das Menü zum Punkt “Katalog” ⇒ “Produkte hinzufügen”. Im Falle deines eigenen Produktes wählst du dann “Ich möchte ein Produkt hinzufügen, das nicht bei Amazon verkauft wird” aus. In der neuen Maske gibst du alle Produktdaten und -texte ein und es kann losgehen.
Falls du hierzu noch eine genauere Anleitung benötigst, schau gerne in unserem Artikel “Neues Produkt im Seller Central anlegen” vorbei.
Zusammenfassung und Schlussfolgerungen
Ein erfolgreiches Amazon Listing ist ein Zusammenspiel verschiedener Elemente, die strategisch eingesetzt werden, um die Sichtbarkeit zu erhöhen und die Kunden zum Kauf zu bewegen. Gerade bei Amazon Listings ist eine stetige Optimierung essenziell. Daher gilt es für dich von nun an, regelmäßig Daten zu Deinem Listing zu sammeln, auszuwerten und datenbasiertes Verbesserungspotenzial zu erkennen.
Hast du noch Fragen? Kontaktiere uns gerne per Mail oder erfahre hier, wie wir als Amazon Agentur Deinen Seller Alltag vereinfachen können!